第10回では、Playerの移動をRigidbody方式へ変更して、スペースキーでジャンプできるようにします。完成したPlayerはPrefab化し、Stage1、Stage2、Stage3で同じ設定を使えるようにします。
Stageが増えるたびにPlayerを作り直すと、設定の違いや修正漏れが発生します。PlayerをPrefabにして共通部分を1か所で管理し、UIや次のScene名だけを各Sceneで設定します。
Character Controllerを外そう
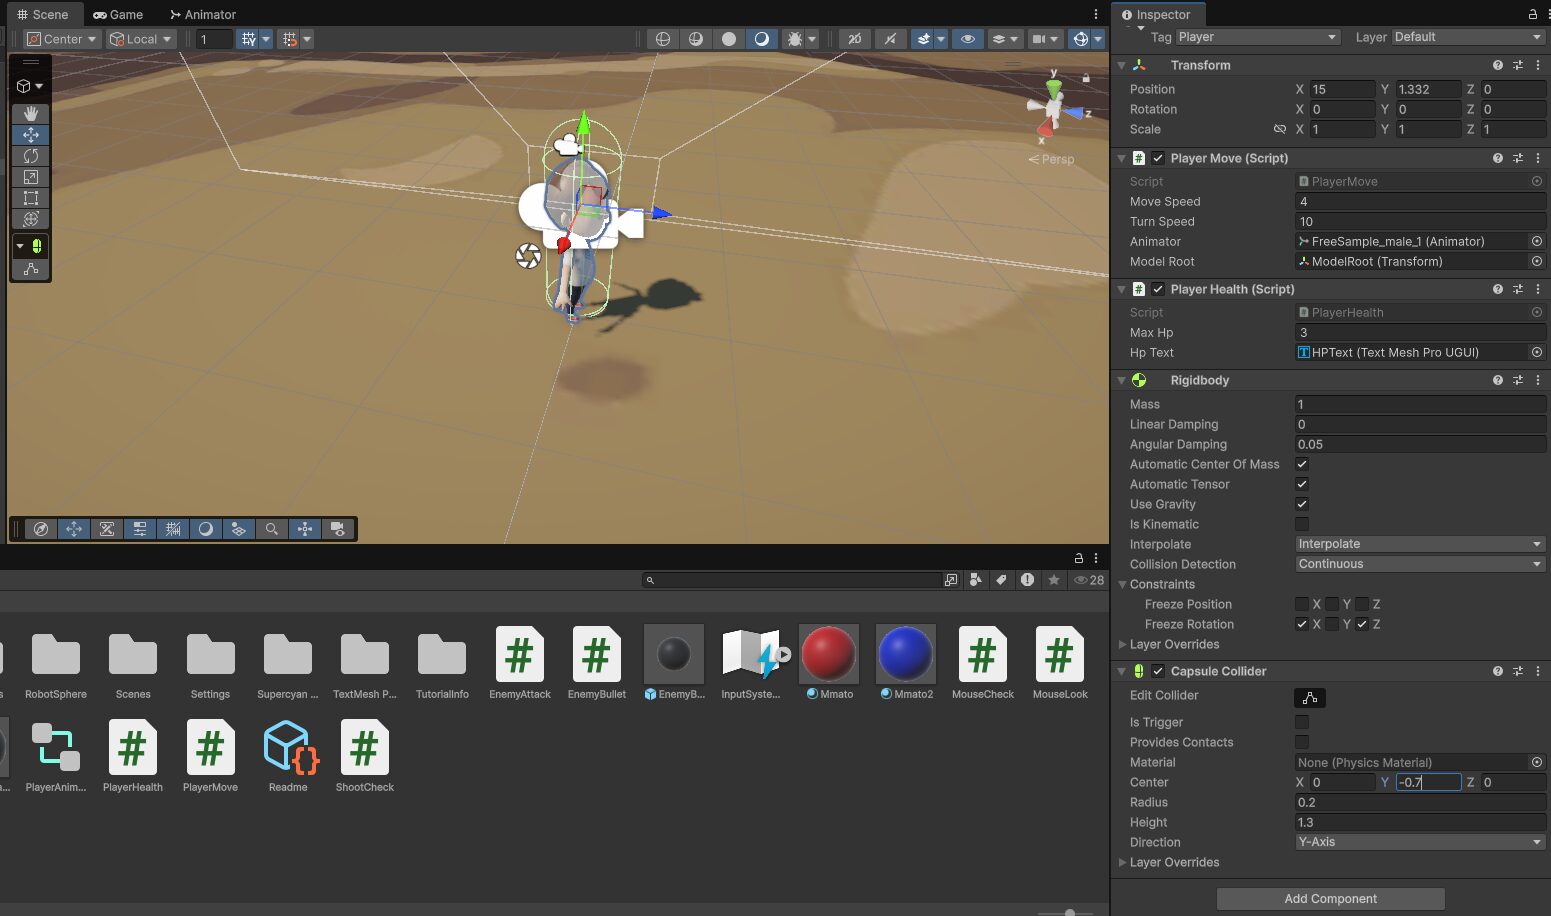
これまでPlayerはCharacter ControllerのMove()で移動していました。今回は重力とジャンプにRigidbodyを使うため、PlayerのCharacter Controllerを削除します。

Character ControllerとRigidbodyを同じPlayerの移動に使うと、位置の更新や衝突判定が競合します。今回はRigidbodyへ統一します。
RigidbodyとCapsule Colliderを追加しよう
PlayerへRigidbodyとCapsule Colliderを追加します。

Rigidbodyは次を目安に設定します。
Mass:1
Use Gravity:オン
Is Kinematic:オフ
Interpolate:Interpolate
Collision Detection:Continuous
Freeze Rotation X:オン
Freeze Rotation Z:オン
Capsule ColliderのCenter、Radius、Heightは、Sceneビューの枠がキャラクターの体を囲むように調整します。モデルの位置や大きさによって正しい数値は変わります。
Groundレイヤーを作ろう
Playerが床に立っているかを調べるため、床用のGroundレイヤーを作ります。

各Stageの床や、ジャンプで着地できる足場のLayerをGroundへ変更します。床にはColliderも必要です。
Groundレイヤー自体は1回作れば全Sceneで使えます。ただし、Stage1、Stage2、Stage3それぞれの床へGroundを割り当てます。
足元にGroundCheckを置こう
Playerを右クリックしてCreate Emptyを選び、名前をGroundCheckにします。
Player
├─ Main Camera
├─ ModelRoot
│  └─ FreeSample_male_1
└─ GroundCheck
GroundCheckをキャラクターの足元へ移動します。

PlayerMoveをRigidbody方式へ変更しよう
PlayerMove.csを次のコードへ置き換えます。WASDの入力はUpdate()で読み、物理移動とジャンプはFixedUpdate()で行います。
PlayerMove.csの完成コード
using UnityEngine;
using UnityEngine.InputSystem;

public class PlayerMove : MonoBehaviour
{
    public float moveSpeed = 4f;
    public float jumpForce = 6f;
    public float turnSpeed = 10f;

    public Animator animator;
    public Transform modelRoot;

    public Transform groundCheck;
    public float groundDistance = 0.25f;
    public LayerMask groundLayer;

    Rigidbody rb;
    Transform cameraTransform;

    Vector3 move;
    bool jumpRequested;
    bool isGrounded;

    void Start()
    {
        rb = GetComponent<Rigidbody>();
        cameraTransform = Camera.main.transform;
    }

    void Update()
    {
        float horizontal = 0f;
        float vertical = 0f;

        if (Keyboard.current != null)
        {
            if (Keyboard.current.aKey.isPressed)
            {
                horizontal -= 1f;
            }

            if (Keyboard.current.dKey.isPressed)
            {
                horizontal += 1f;
            }

            if (Keyboard.current.sKey.isPressed)
            {
                vertical -= 1f;
            }

            if (Keyboard.current.wKey.isPressed)
            {
                vertical += 1f;
            }
        }

        Vector3 forward = cameraTransform.forward;
        Vector3 right = cameraTransform.right;

        forward.y = 0f;
        right.y = 0f;
        forward.Normalize();
        right.Normalize();

        move =
            forward * vertical +
            right * horizontal;

        move = Vector3.ClampMagnitude(move, 1f);

        isGrounded = Physics.CheckSphere(
            groundCheck.position,
            groundDistance,
            groundLayer,
            QueryTriggerInteraction.Ignore);

        if (Keyboard.current != null &&
            Keyboard.current.spaceKey.wasPressedThisFrame &&
            isGrounded)
        {
            jumpRequested = true;
        }

        if (modelRoot != null &&
            move.sqrMagnitude > 0.01f)
        {
            Quaternion targetRotation =
                Quaternion.LookRotation(
                    move,
                    Vector3.up);

            modelRoot.rotation =
                Quaternion.Slerp(
                    modelRoot.rotation,
                    targetRotation,
                    turnSpeed * Time.deltaTime);
        }

        if (animator != null)
        {
            animator.SetFloat(
                "MoveSpeed",
                move.magnitude,
                0.1f,
                Time.deltaTime);

            animator.SetBool(
                "Grounded",
                isGrounded);
        }
    }

    void FixedUpdate()
    {
        Vector3 currentVelocity =
            rb.linearVelocity;

        rb.linearVelocity =
            new Vector3(
                move.x * moveSpeed,
                currentVelocity.y,
                move.z * moveSpeed);

        if (jumpRequested)
        {
            rb.AddForce(
                Vector3.up * jumpForce,
                ForceMode.Impulse);

            jumpRequested = false;
        }
    }

    void OnDrawGizmosSelected()
    {
        if (groundCheck == null)
        {
            return;
        }

        Gizmos.color =
            isGrounded ? Color.green : Color.red;

        Gizmos.DrawWireSphere(
            groundCheck.position,
            groundDistance);
    }
}
Player MoveのInspectorでAnimator、Model Root、Ground Check、Ground Layerを登録します。スペースキーでジャンプし、空中ではGroundedがfalseになります。
完成したPlayerをPrefab化しよう
ここが複数Stageを作るうえで重要な工程です。ProjectにPrefabsフォルダーを作り、HierarchyのPlayerをドラッグしてPlayer Prefabを作ります。
Assets
└─ Prefabs
└─ Player.prefab- Rigidbody、Collider、GroundCheckの設定を全Stageでそろえられる。
- PlayerMoveを直したときに修正漏れを防げる。
- モデル、Animator、Main Cameraの階層を毎回作り直さずに済む。
- 新しいStageへ同じPlayerをすぐ配置できる。
ほかのSceneでは既存Playerを削除してからPlayer Prefabを配置します。既存Playerを残すと、Main CameraやAudio Listenerが2つになるため注意してください。
Sceneごとの参照を登録し直そう
Prefab Assetは、Scene内のCanvasにあるScoreText、TimerText、HPTextを参照できません。Player PrefabをStageへ置いた後、各SceneでUIを登録し直します。
これらはSceneごとのPrefab Overrideとして残します。UI参照やNext Scene NameをPrefabへApply Allしないでください。
NullReferenceExceptionで撃てない場合
PlayerをPrefabへ置き換えた後、次のエラーが出て射撃できなくなることがあります。
NullReferenceException:
Object reference not set to an instance of an object
ShootCheck.Start()
ShootCheck.Update()
原因は、Shoot CheckのScore TextとTimer TextがNoneになっていることです。Updateがエラーで止まり、クリックを調べる射撃処理まで進めません。

HierarchyのCanvasからScoreTextとTimerTextをドラッグして登録します。

ShootCheckはCameraコンポーネントと同じMain Cameraへ付けます。修正後はCtrl + SでSceneを保存し、ConsoleをClearして再生します。
各Stageで動作確認しよう
- WASDでPlayerが移動する。
- スペースキーでジャンプする。
- 空中で二段ジャンプしない。
- 着地すると再びジャンプできる。
- スコア、タイマー、HPが表示される。
- クリックでTargetを撃てる。
- すべて倒すと次のStageへ進む。
スコアとHPを次のStageへ引き継ごう
Player Prefabを配置しても、Sceneが変わるとスコアやHPは初期値へ戻ります。次回はゲーム全体のデータをStage間で引き継ぎます。
コメント